Lift Kits
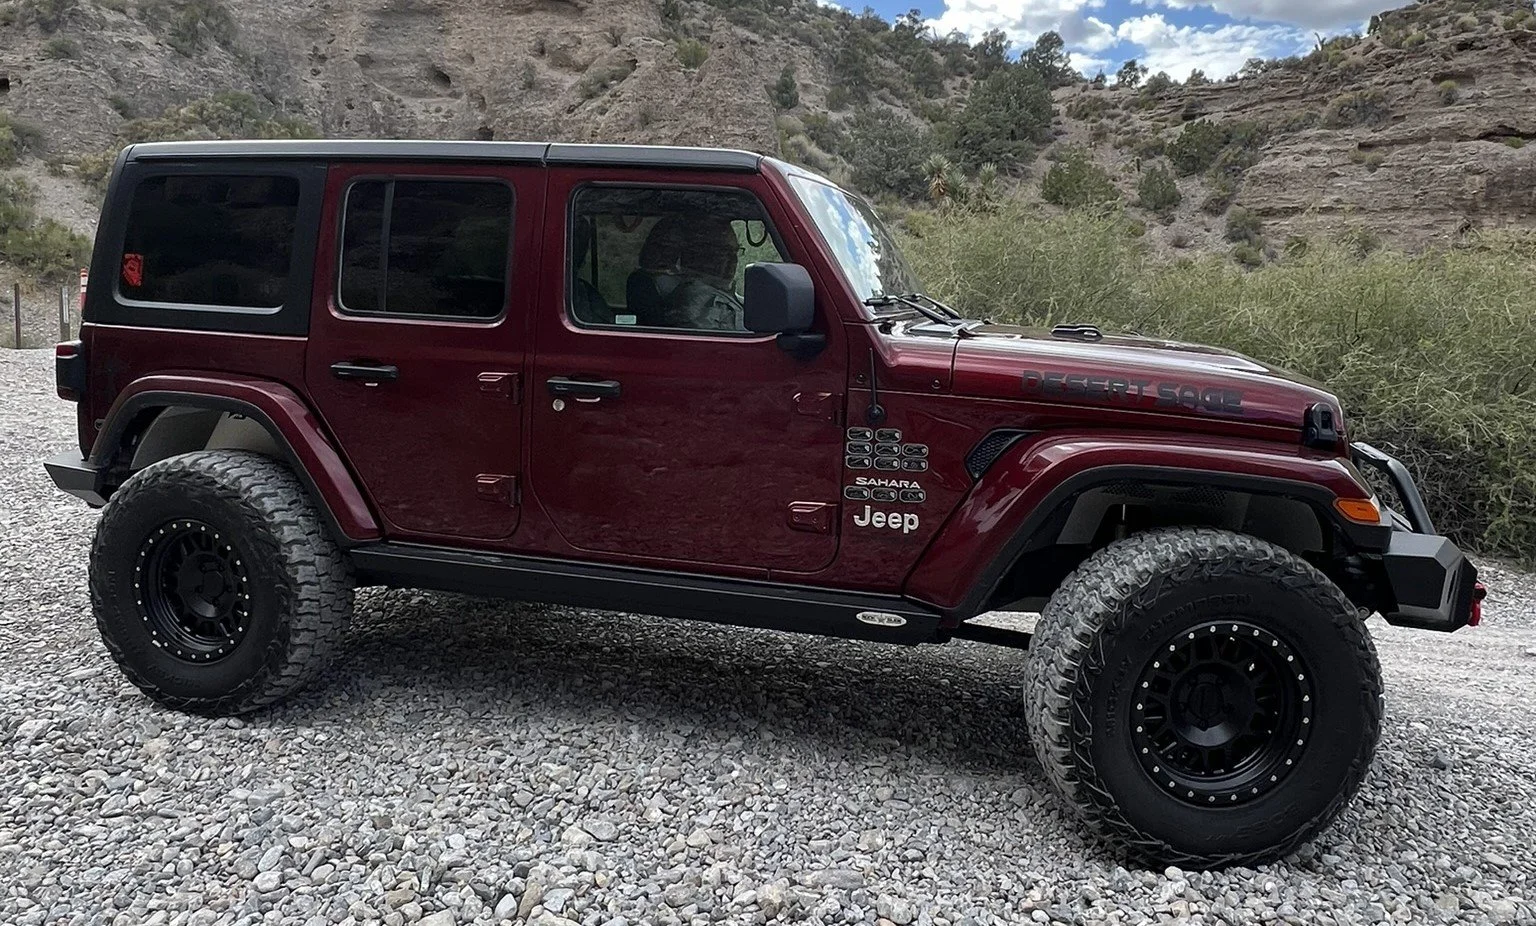
Wrangler Sahara with 2.5 inch lift and 35-inch tires
Lift kits have the following benefits for offroading:
Better ground clearance of the chassis
A greater range of suspension travel or articulation
Allows more height in the wheel well for larger tires
In our 101: Basics tutorial, we mentioned how your overall ground clearance is based on two criteria: axle height and chassis height.
The axle height is determined by the diameter of the tires. The larger the diameter, the greater the height of the axle. For instance, 33-inch tires would theoretically (at the center of the tire) place the center of the axle at 16.5 inches. Of course, the axle and its hardware have girth, so your axle would not clear 16 inches. 35-inch tires are two inches greater in diameter, but the center of your axle would be one inch higher.
In terms of ground clearance, you have to factor in the size of your differentials because those hang lower than your axle shafts. On Jeeps, the front differential is toward the Drivers side, while the rear differential is centered. So your maximum axle clearance would be towards the Passenger side of center.
However, we also discussed how the best way to get over rocks and obstacles is not to straddle them, but to place one tire directly in its path and to drive up & over. That raises one side of the axle, tilting the entire axle, allowing us to clear the rock. But when the tire comes down on the other side of that rock, that tall mound will now want to scrape the underside of our Jeep.
This is where the LIFT comes into play. A lift is a modification to your suspension that raises the entire chassis & body higher from the axle. Adding even a couple of inches of height makes a significant difference when you are offroad.
There are three main categories of lift kits.
Leveling kits are the most basic and are used to reduce the forward rake on Jeeps that are front heavy, such as diesels or vehicles with heavy steel bumpers and large winches. They improve balance and aesthetics, but do not increase clearance.
Body Lifts and Coil Spring Spacers are inexpensive and simple ways to lift a jeep. A body lift adds extra space between the body and frame and can provide 1-2 inches of lift without changing the suspension or stock wheel size. It is more for looks, since it does not enhance offroad clearance. Coil spacers are placed on top of your original coil springs, and do not require a lot of adjustments. It can provide additional clearance in the wheel wells to accommodate slightly larger tires.
Suspension Lifts are the real thing and are what you should be considering. To properly lift a Jeep, you need to address the entire geometry of your suspension. That entails not only raising the chassis higher from the axle, but also making changes to the supports that maintain the axle centered in place.

Image courtesy of Extreme Terrain
Here is a layman’s explanation of how a lift affects your undercarriage.
New coil springs will increase the height of the axle from the chassis. However, that leaves the axle to just bob around like a pendulum.
Two horizontal bars, aka the lower control arms, anchor the axle to the chassis while allowing for vertical movement. When the coils are at rest, the lower control arms ensure that the axle is centered front/back within the wheel well. As the coil extends or compresses, the axle will follow an arc and slightly change its front/back position under the Jeep.

Upper and lower control arms connect axle to chassis
The axle is not an isolated entity. A key component of the axle is the differential, which in turn is connected to a driveshaft.
The angle of the junction (aka pinion) of differential and driveshaft needs to be maintained as straight as possible; and that is the function of the upper control arms.
Think of a horizontal trapezoid (such as an X-ray machine or drafting table arm) and how pulling the upper and lower lines would dictate the vertical angle of one side.
The Track Bar functions to keep the axle from swinging side to side. Picture a Z underneath the chassis. That diagonal line is the Track Bar, and it keeps the axle centered laterally.
Although we tend to picture our axles as round cylinders, in terms of suspension it is better to visualize them as a rectangular bar, with a top and bottom. Ignore that the inside of the axle is a rotating shaft; just think for now in terms of the fixed outside shell. The rotational axis of that housing is known as caster. Caster determines two things: the angle of how your wheel is connected, and the angle of the pinion in the back of the differential. If the wheel caster is not set properly, it affects how the steering handles and how the tires would naturally point. If the pinion angle is too steep, it will overstress the driveshaft.
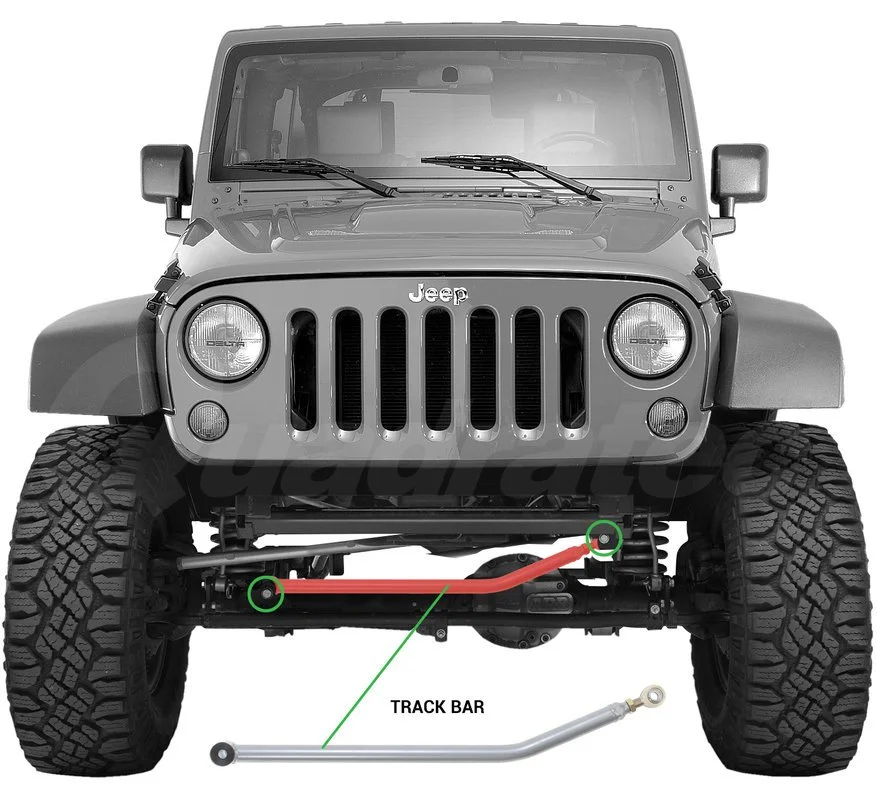
Image courtesy of Quadratec.
When you increase the distance between the axle and the chassis, simple geometry would dictate that you are increasing the angle of the driveshaft to the differential. With a shorter lift (up to 2.5 inches), the increase of that angle is within tolerances. Taller lifts require more attention to hardware.
For learn more information about track bars, we recommend this article on the Quadratec website.
As you can see, a suspension lift is a complex modification, and a good lift kit may include coil springs, upper and lower control arms (which now need to be longer than the stock ones), a longer track bar, sway bars, shock absorbers, and maybe some miscellaneous hardware such as longer brake lines, wires, and other stuff.
Unless you are an experienced mechanic (in which case you probably aren’t reading introductory articles like this) – I strongly urge you NOT to tackle a lift on your own. If not done absolutely right, with perfect alignment and torque spec – you could be asking for disaster. A friend of ours did his own lift; got some angles wrong and did not tighten something enough – and wound up destroying his differential, driveshaft, transfer case, transmission, and other stuff. It looked like he ran over a mine on a battlefield. Yup, saved money by doing it himself!
Here is our advice for Beginners contemplating a lift. Yes, a lift is definitely something that you want for offroading – even for the easier trails rated 2-3. Rubicons come from the factory with a slight body lift, roughly 1.5 to 2 inches. Saharas also are slightly lifted, around one inch.
We would recommend starting with a 2.5-inch suspension lift for easy to intermediate offroading. Your Jeep would still remain a comfortable daily driver, and you would not suffer at high speed on freeways. Larger 33 or 35 inch tires will fit fine.
If you picture yourself getting into intermediate to advanced rock crawling and taking on the more difficult trails – then think about 3.5 inch to 4.5-inch lifts.
Because my wife used to drive our Jeep Sahara as her daily driver, and we were not into rock crawling for rock crawling’s sake, we opted for a 2.5-inch lift. These days, we do trails rated 4 and 5, on 35-inch tires – no problem.
A good suspension lift is not inexpensive. There are budget kits on the market, but always remember the old adage that you get what you pay for. These cheaper kits cost less because they are built cheaper. Thinner construction, poorer quality bushings, economy shock absorbers. Control arms are fixed length rather than adjustable length.
Lifts are your suspension… do not scrimp. The good stuff will hold up to all sorts of trail abuse; the bargain kits will seem fine in the beginning, but may wear out prematurely.
Find a reputable mechanic who specializes in offroad modifications. Let them recommend the brand and model, based on their experience.
More often than not, the experts on lift kits are NOT the Service Reps at your local car dealership. Find a local offroading club and ask them for recommended 4x4 shops.

Retractable slider step from Rock Slide Engineering
When you do get a lift kit, and are riding on larger tires – you may want to consider some sort of entry step. My wife and I are short, so clambering up a lifted jeep on 35-inch tires is challenging. You can get “slider steps” to replace the plastic running boards. These will provide a reinforced edge under the door panels to support the weight of the jeep if a rock wants to greet you (the “rock slider”). Attached to these sliders are rungs or a small step to provide easier vehicle access.
On our Sahara, we opted for pricier retractable steps from Rock Slide Engineering. (There are less expensive alternatives from other companies, but we liked what we heard about RSE.) When the doors are closed, the drop-down step automatically retracts into the base of the rock slider that protects our door frame. Kinda like landing gear on a plane! Not inexpensive, but it provides higher clearance when retracted, but a lower step when extended.
To learn more about lifts, I recommend visiting the websites of Quadratec and Extreme Terrain. These are major online parts & accessories suppliers, who offer lots of free educational articles and videos. Their catalogs are free and full of nasty ways to spend your money.
Here are two excellent articles that go into greater detail about lift kits
We were not compensated or rewarded for mentioning Extreme Terrain and Quadratec. Both of these online suppliers are legend in the offroad community and their libraries of articles and videos are fantastic resources about a large variety of products from multiple manufacturers..