Section 7: Recovery Gear
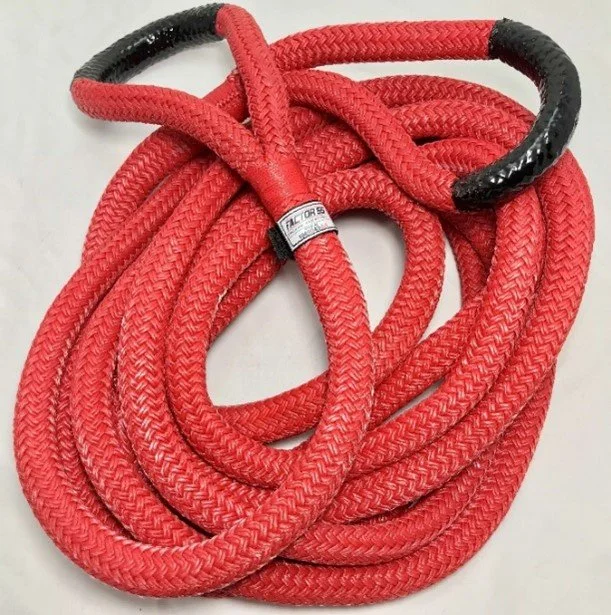
Kinetic recovery “snatch strap”
If you go offroading with other people, you do not need to rush out and purchase recovery equipment. That is the advantage of traveling with a group; they will have plenty of gear amongst them to get you unstuck and back on the trail. See what other people in the club use and recommend. Learn what specs to look for when shopping around for recovery gear. Our club’s recovery experts (members of a certified, volunteer recovery organization called SNORR) have told us that there are lots of inexpensive alternatives that work just as well as the high priced big-name brands.
One word of caution, though. (In case you did not read the previous chapters.) The other drivers in your trail group will help you change or repair a tire if necessary, but do not expect them to loan you a spare tire! You must have a matching, full-size AT/MT heavy duty spare tire of your own. Fellow travelers can provide jacks, breaker bars, and muscle – but you have to bring along the right lug nut sockets and lug nut keys for your tires.
Traction Boards


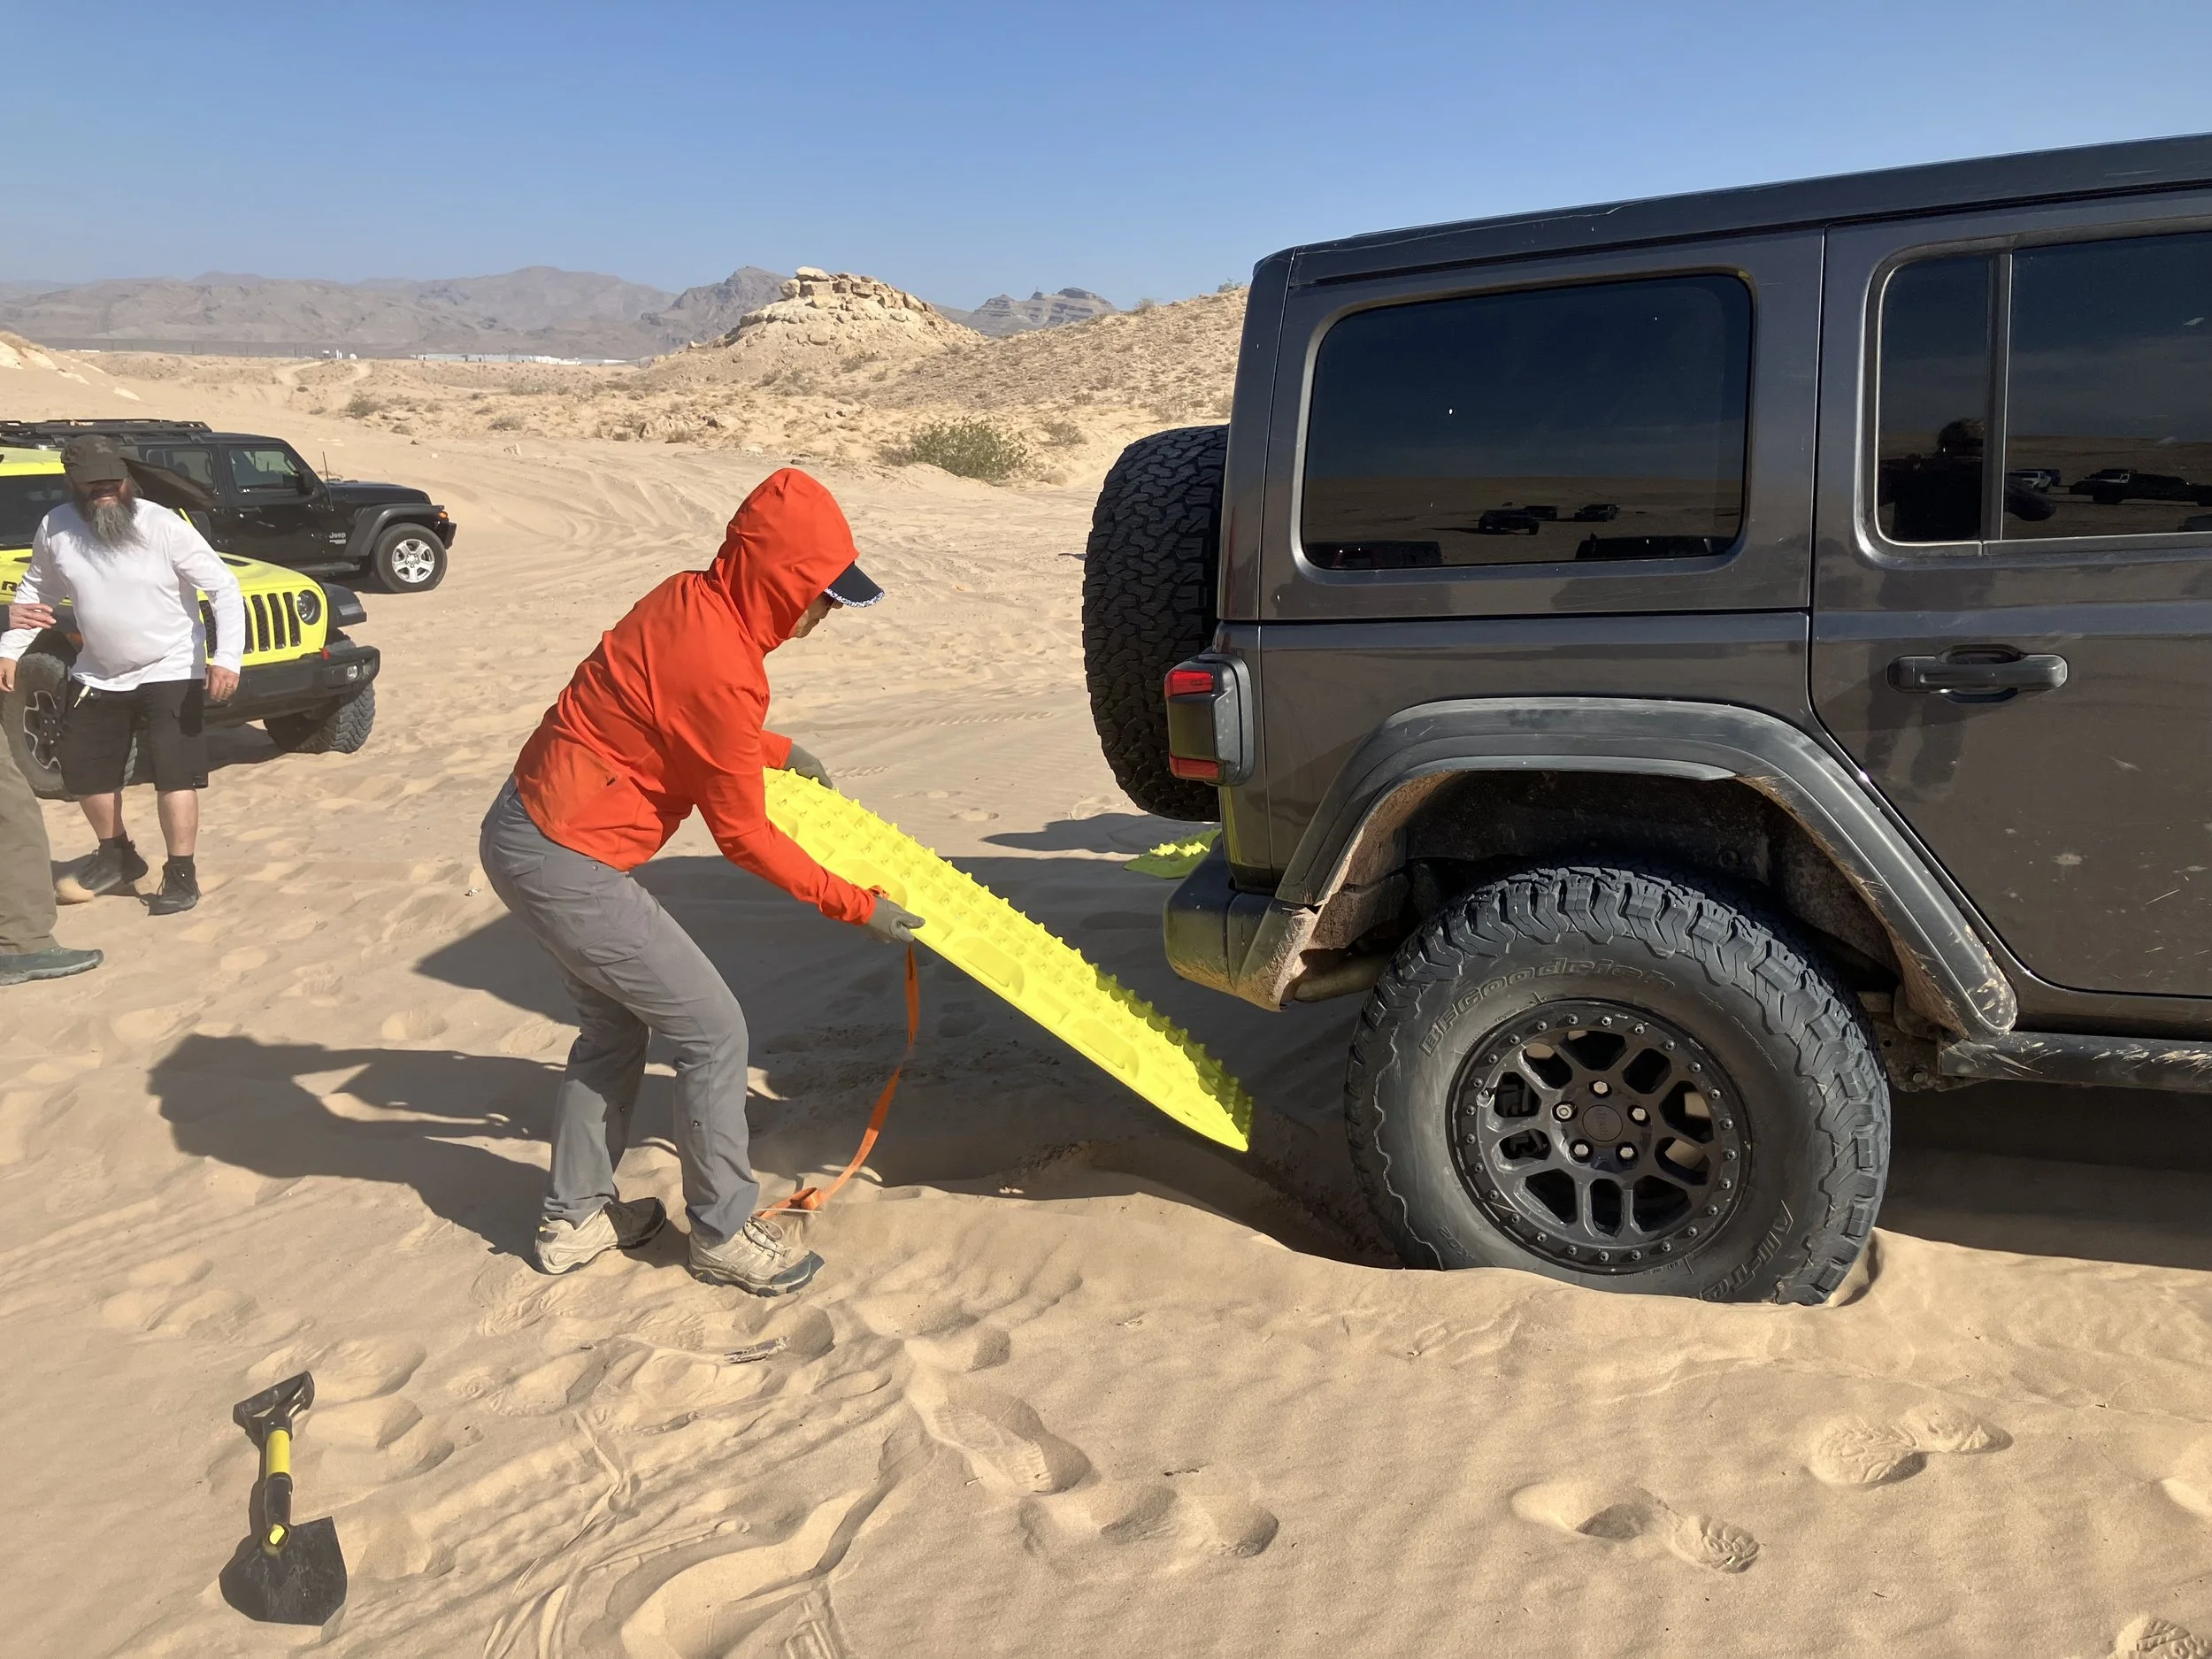
Traction boards are probably the most versatile recovery gear you can carry. A pair of these (two boards) can get you unstuck from soft terrain such as sand, snow, and mud.

X-Bull brand traction boards mounted to our jeep
To use traction boards, the first step is to dig the buildup of sand or snow away from the tires. When you got stuck, the tires probably dug themselves into a crater and at the same time threw a mound or wall of material up around the tires. Use your shovel, or the nose of the traction board itself, to dig away that excess mound. Then, dig some more to create a sloped exit ramp for your tire. Check to see if you are high centered, meaning that there is an accumulation of material directly under and supporting your vehicle. Dig that out. (We told you that a long handled shovel is useful.)
Jam the traction board along the sloped ramp and wedge it firmly against the leading edge of the tires. The board will be jutting up into the air, on an angle.
Put your vehicle in 4wd-low, low gear such as M1 if you have semi-manual options and just drive slowly out.
If that fails, try digging a friendlier ramp, and letting more air out of your tires (you can always reinflate afterwards).
The best traction boards are the original Australian MaxTrax boards, which are pricey for a set. However, if you don’t spend every day driving in stuff that might get you stuck, you could safely opt for a less expensive option. Yes, the cheaper ones might eventually crack or buckle under harsh conditions or repeated use, but chances are that you won’t be using them on a frequent basis.

Traction boards come in different sizes, priced from inexpensive to $$$$. You don’t need large nor pricey to get started.
For example, both Jeeps in our family are equipped with X-Bull brand, that cost a fraction of the MaxTrax. We have tested the X-Bulls in recovery training classes held in the sand dunes, and they worked just fine.
“If your traction boards did not come with a carry bag, bring a large trash bag along. After deploying the boards, they can get pretty dirty and you probably don’t want all that mess in the back of your vehicle. Tie a short rope onto the end of the board, to make it easier to retrieve after being driven over and pushed into the muck.”
Recovery Straps
There are three different categories of RECOVERY STRAPS that you should eventually carry in your vehicle.
· Tow straps
· Tree savers
· Kinetic recovery ropes
Let’s start by explaining Tow straps.

Tow straps are usually 20-30 foot long, and are either a flat 2 to 4 inch wide synthetic strap (kind of like a thick seatbelt?) or a thick synthetic rope. The 2 inch wide straps are rated for a safe working limit up to 20,000 pounds. The 3 inch straps are rated for 30,000 pounds.
Tow straps are flexible, but do not stretch out and then rebound the way a kinetic strap would. Even under a lot of tension, tow straps maintain their original length. Tow straps are for towing a vehicle; not for jerking loose a vehicle that is stuck in loose terrain.
For towing, twenty feet is a good length. Thirty feet can get unwieldy if you are pulling a car through a winding offroad trail. Although 20,000 pounds is way more than you should need for regular towing, a 30,000 rated strap could be better when you use the strap for other purposes, such as to anchor a winching vehicle or as a line extension.

The ends of your tow strap should be fabric eye loops, not metal hooks. Hooks can slip loose, or snap apart. When that happens, you have a chunk of metal being sling shot through the air!
The tow strap can also function in your recovery kit as a winch line extension, a kinetic rope extension, a (long) tree saver, or a line to anchor (the vehicle with the winch) to a tree or to another vehicle.

Example of 3 inch tow strap.
Avoid using steel chains for towing. Not only is the chain dangerous in the event of a link breaking, causing the line to sling shot or whip – but if it drags across a rock or debris, it could spark and create a brushfire.
Bottom line: get a 20 foot by 3 inch wide tow strap for your kit. Shop around, you do not have to purchase expensive name brands, so long as they are certified with a “minimum breaking strength”.
“Always look for the “minimum breaking strength” and never go by the “maximum breaking strength”. The minimum is the spec of the weakest unit from the test sample; most units tested higher. The max is the spec of the highest testing sample, and most units tested lower.”
Understanding how recovery gear is rated
Minimum breaking strength versus Maximum breaking strength. As Greg L points out, the only number that we should be concerned with is the Minimum Breaking Strength. If you took 100 samples, let’s say, of a recovery strap and tested them, the strap that broke first (say, at 20k pounds force) would be the Minimum Breaking Strength. The strap that held out the longest and took 24k pounds before breaking would be the Maximum Breaking strength. Marketing charlatans will promote the Max, but safety experts pay attention to the weakest strap in the lot.
The other number to pay attention to is the Recommended Working Load Limit. That number is derived by dividing the Minimum Breaking Strength by a safety factor of two or three, to provide greater margin of safety. So our strap, with an MBS of 20k, would have a Working Limit of 10k or 7k.
For simple offroad recovery purposes, it is fine to go with a safety factor of two. If a line breaks, it just means that a Jeep is still stuck in the sand. Save the complex recoveries for the experts!
Metal hard shackles are originally intended for industrial crane lifts, so they are mandated with a five to one safety factor. So a shackle with a working load limit of 20k could actually hold up to 100k.
Tree savers

Tree saver used to anchor a donut pulley
Tree saver is terminology for what is essentially just a wide, four to eight foot long tow strap. Not a narrow rope!
Although most modern winch lines are soft synthetic rope and no longer braided steel wire -- wrapping a winch line directly around the bark of a tree, and then exerting thousands of pounds of tension against it could circumcise the bark and kill or greatly damage the tree. The tree saver is a wide strap (never a rope nor wire) that goes around a tree, and provides an anchor point for connecting a winch line, pulley, or other fixed line.
In addition to using tree savers to anchor around trees, we use them as utility tools during recovery. A tree saver could loop around an axle or chassis frame in order to provide an attachment point, if the stranded vehicle is not equipped with strong recovery points or shackles on its bumper.
A tree strap could be used to create a Y and distribute the tension to two recovery points on a vehicle.
Tree savers are inexpensive; I keep at least two in my kit.
Kinetic “snatch” straps


Kinetic ropes (or wide straps) are akin to bungee cords. Unlike tow straps that maintain their original length under tension, kinetic straps are designed to stretch as tension is applied to them, and then to spring back releasing that pent up energy.
If a vehicle is bogged down, its tires spinning without traction, we can pull and jerk it loose. That is called a “kinetic recovery”. To do that, we attach each end of the kinetic line to a very secure recovery point, such as a bumper shackle or a receiver hitch.
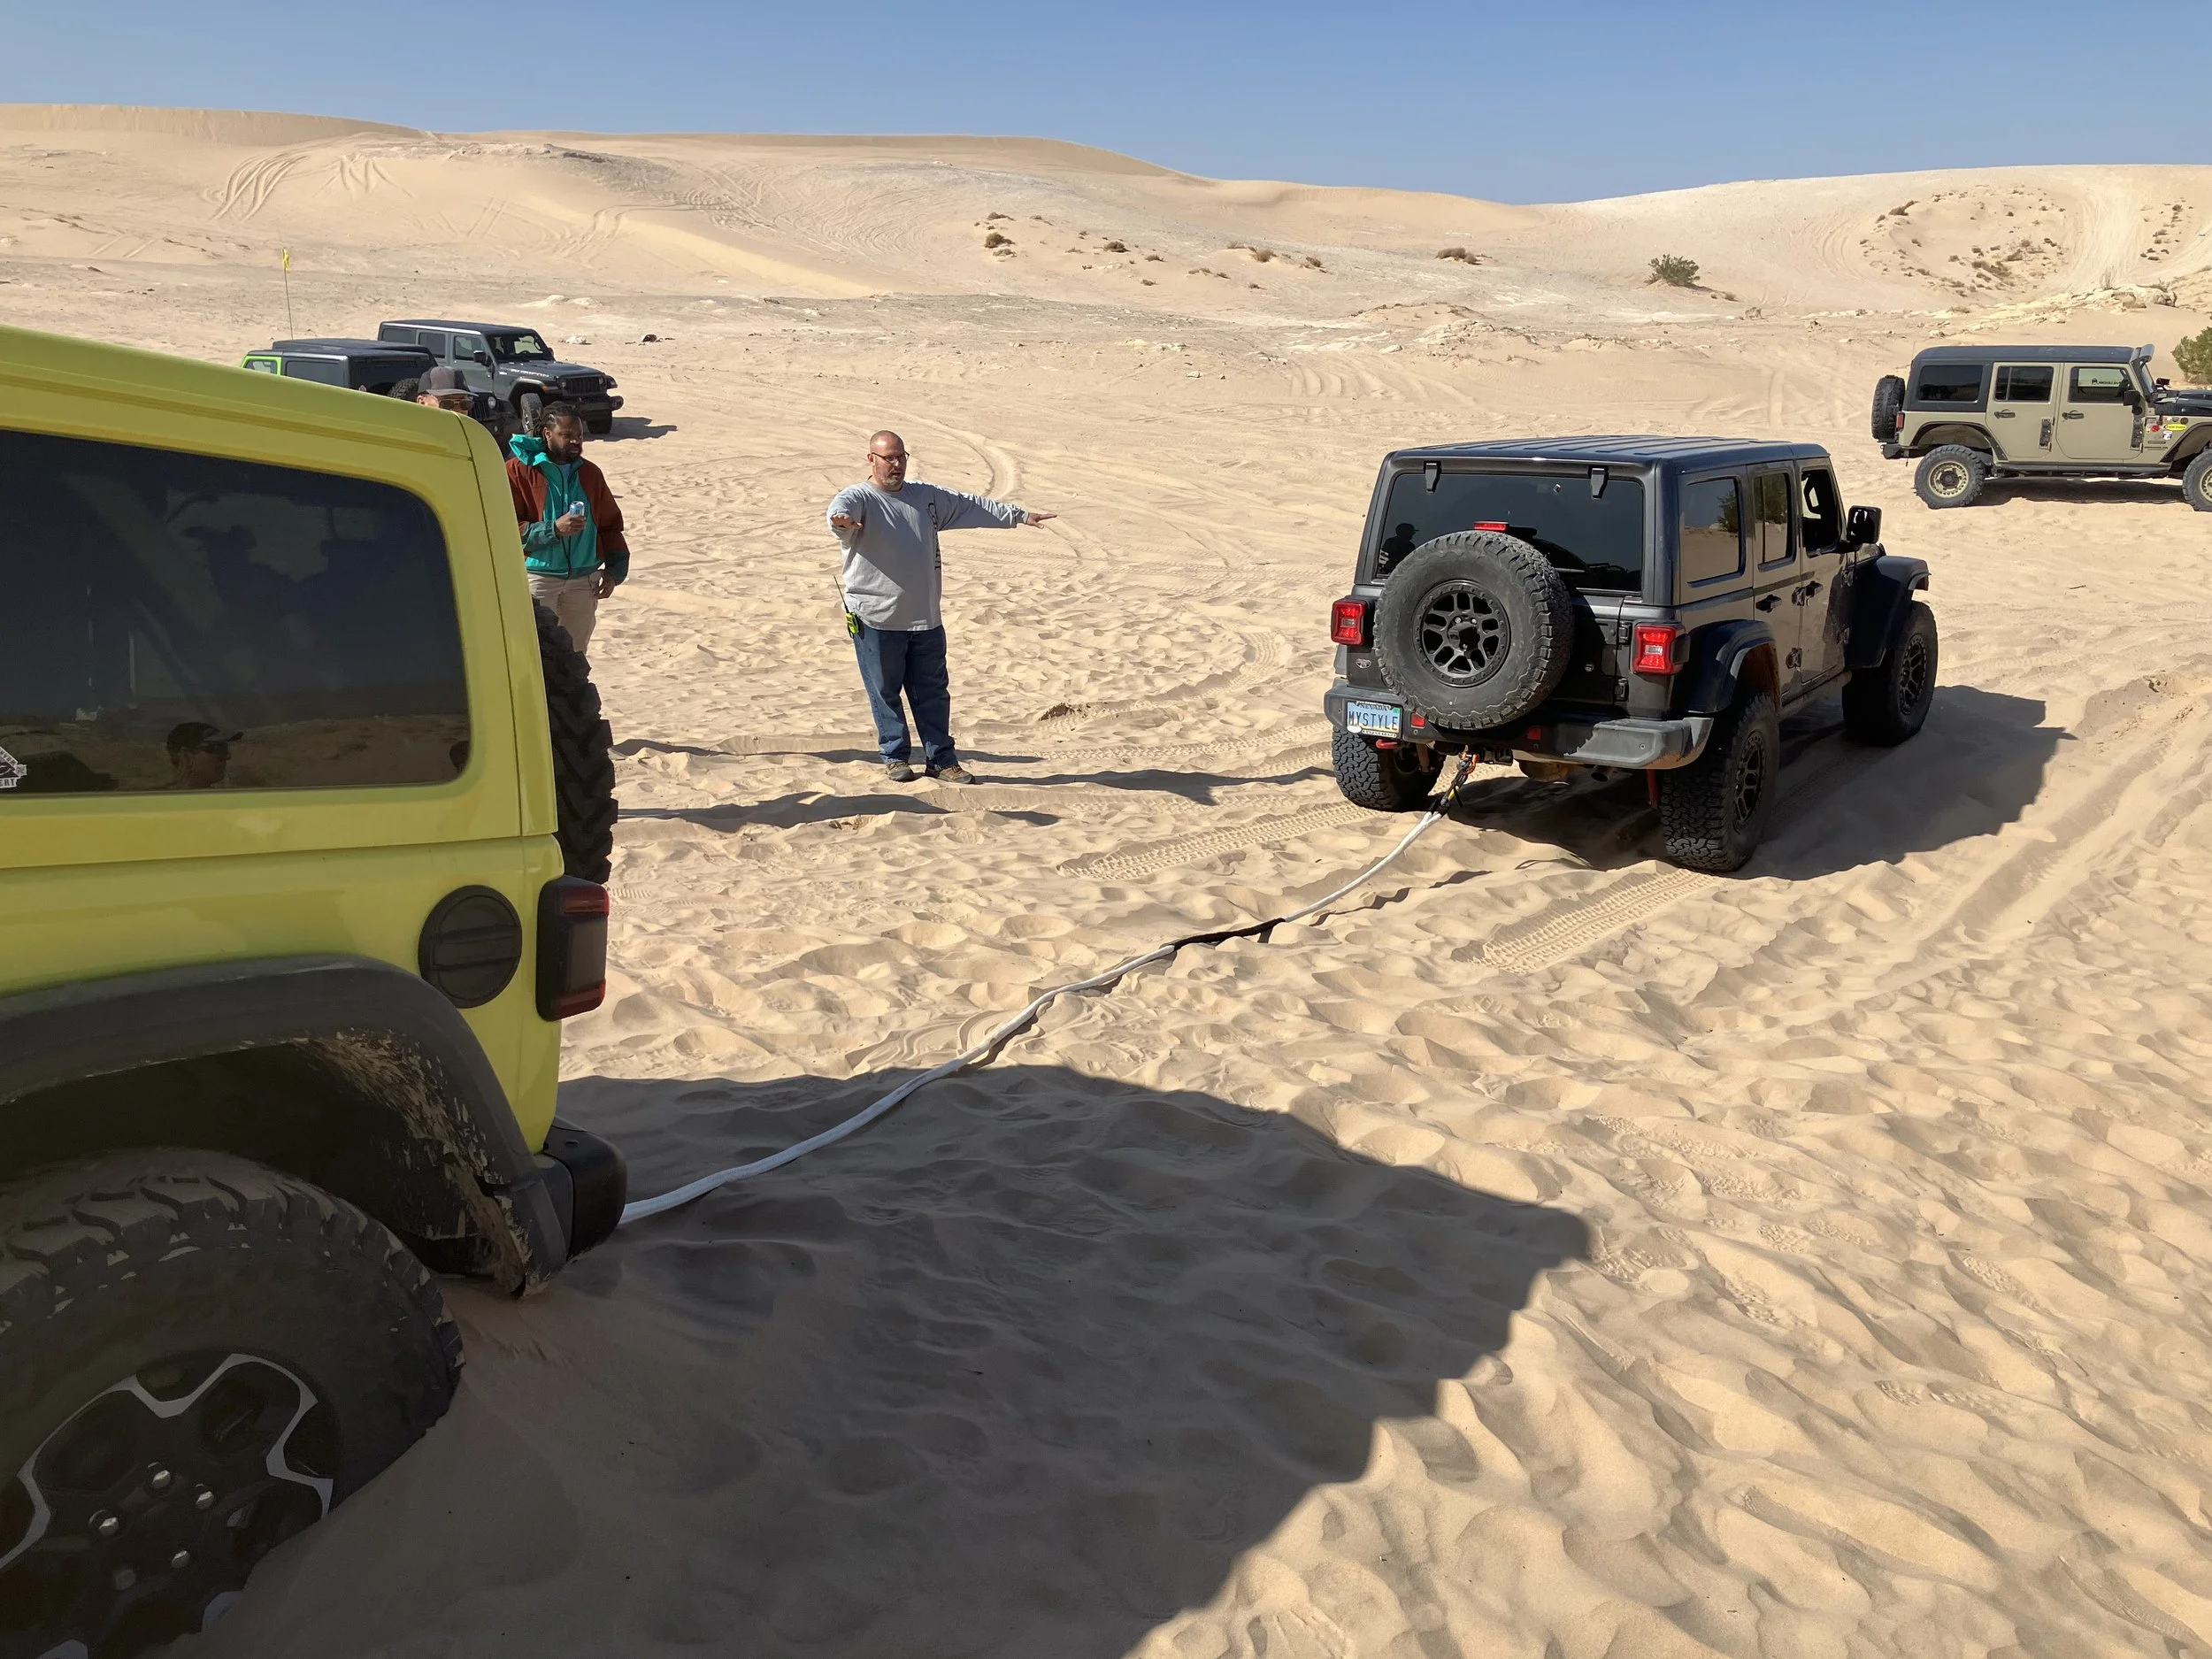
The recovery vehicle backs up towards the stranded vehicle so that there is approximately five feet of slack in the line. Both vehicles are in 4wd low gear. The recovery vehicle slowly pulls at 5 mph. The slack in the line becomes taut, the kinetic rope stretches a decent percentage (20-30%), and then it snaps back and jerks the stuck vehicle out of the muck.
If the first attempt fails, then try it again, but this time with ten feet of slack. Still only 5 mph, though.
If ten feet @ 5 mph fails, then a kinetic snatch is not going to work. Time to hook up a winch and pull the other car out.
“You may be asking, “Why not just go with the winch to begin with?” Winching is hard and time consuming. Kinetic recovery requires almost no physical effort, just grab two soft shackles, hook up the line, and go. Winching requires unspooling the winch line, attaching it, possibly anchoring the recovery vehicle so it isn’t the one moving, connecting the winch remote control, and a couple more steps. Takes a lot longer and requires more work in real life than the edited versions you see on YouTube.”
I was advised to purchase a 20 to 30 foot kinetic rope of 7/8 inch diameter, rated for 25,000 pounds. My jeep only weighs around 4000 pounds, so it would not be possible for me to put more than several thousand pounds of tension onto that line. My jeep will break before the line would!
You sometimes want the longer length, so that the vehicle being snatched won’t rear end you. Also, you probably want to be as far away from the soft muck that trapped the first vehicle. If you need extra distance, then use your tow strap as an extension. Even though the tow strap doesn’t stretch, the kinetic strap has enough stretch to do the job.
On the other hand, there may not be enough working space on some trails to achieve 30 feet distance, so the 20 ft kinetic might be a better choice. I use a 20 footer, and just add a tree saver or tow strap if I need longer distance. Ask five experts, and you will get ten answers!
Kinetic lines are also available as flat straps. They both work equally well, though I prefer the rope style just out of ergonomics.
Do NOT use a kinetic line for straight towing. Every time that you stop and start you will have a bungee effect, and the tow vehicle might rear end you. Also, it will ruin the kinetic line and someone will have to pay for a new one. Nor would you want to use your kinetic line as a winch line extension, or as an anchor line.
Recovery Shackles
Our various ropes or straps terminate at both ends with a closed loop. We need a way to connect these lines to our vehicle, or to connect the lines to each other.

D-ring hard shackles, receiver hitch, bumper recovery points
The most recognized connector is the D-ring hard shackle. We use hard shackles to connect onto steel rings that are integral or strongly welded onto steel bumpers. If you were to run your finger through the steel ring openings, you would feel at least one sharp edge along the inside of the donut hole.
The locking pin of the D-ring shackle does not risk being worn and cut by those sharp inner edges the way a cloth shackle would be. So to join anything synthetic to sharp metal, we use the metal shackles, which have a smooth rounded end that is safe for synthetic ropes.
Steel shackles are made for, and certified by, the crane industries. Their actual breaking strength is five times their rated strength, so they are not the weak point. The welded rings welded into your bumper, or your bumper itself, are more likely to break than a ¾ inch D-ring.
When you use a D-ring, it is proper technique to loosen the locking screw pin slightly. Otherwise, the threads could lock up under extreme tension. Also, if the shackle is vertical, then the locking pin should screw downward (so you remember not “to screw up”). Some D-ring shackles have a second hole for a cotter pin, to prevent the pin from screwing loose while affixed full-time on your bumper.

Receiver hitch shackle
Receiver hitch shackles are designed to provide a secure recovery point by attaching in the rear receiver hitch. For vehicles that do not have welded shackle points on their rear bumpers, this is a good solution.

NEVER attach a recovery line to a tow ball hitch!
Never attach a tow line or a kinetic line to a tow ball! Under rapid tension, the ball will snap off and could sling shot back into the other vehicle like a cannon ball. I’m not exaggerating. There are documented cases of tow balls crashing through the windshields, resulting in serious injuries including a fatality.
Towing a heavy trailer creates a different kind of stress than an extreme jerk & pull. The trailer exerts downward pressure, and the pull is steady yet controlled. Kinetic and tow lines create rapid acceleration and high momentary tension that pull the ball like a lever, overstressing its single point of mounting beneath the ball.
If no one has a receiver hitch shackle, then insert the eye loop of the strap into the hitch receiver, and secure the loop with the horizontal hitch pin. If there is a lot of extreme tension, the pin might bend slightly and require power tools to remove it, but that is way better than having a tow ball hitch break loose and wreck havoc.


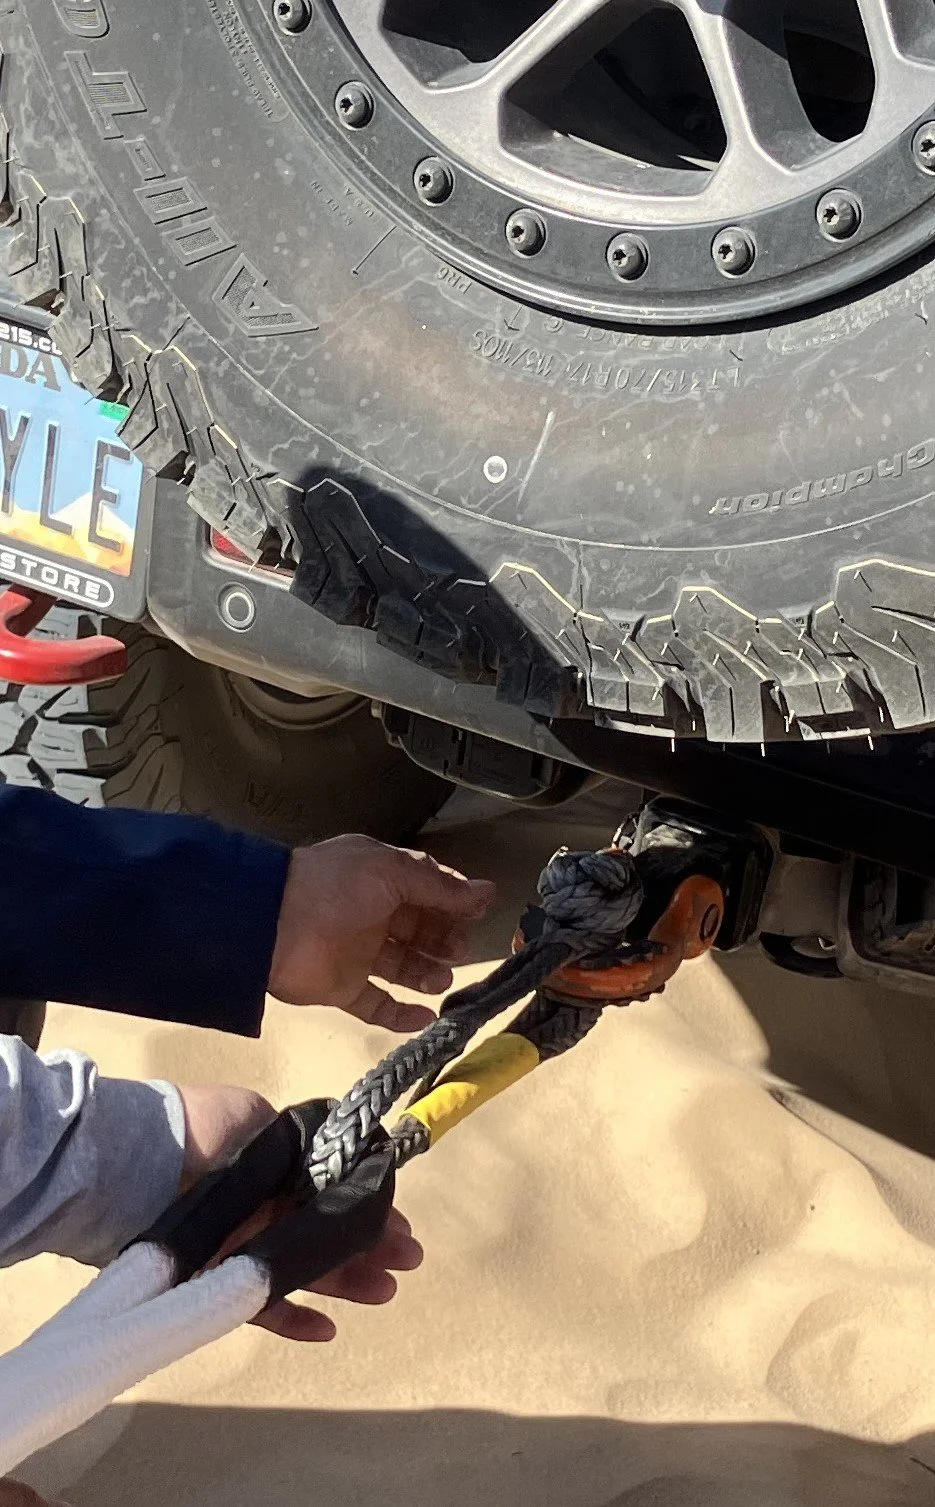
Soft shackles are made from synthetic fiber and provide as much strength as their steel D-ring counterparts. For example, a ½ inch soft shackle is rated to 30,000 pounds – which is more than the lines you would attach it to.
Soft shackle used to attach kinetic line to receiver hitch. Note that the tension pulls against the neck of the knot.
We use soft shackles to join synthetic lines to synthetic lines, or to go between a D-ring and a synthetic line.
The D-ring hard shackle is used for attaching directly to a metal ring or fixed mounting point, such as on a bumper or sheet metal snatchblock that may have 90 degree or sharp edges which could cut a synthetic line.
When you deploy a soft shackle, the angles of force or tension should be perpendicular to the knotty part. You want to pull on the noose sideways, not up and over the knot.
You can find soft shackles on Amazon for around twenty dollars per pair of two. They are handy for all sorts of things. I store a couple behind my headrests, so that my rear passengers have something to hold onto, or for hanging stuff.
“The D-ring hard shackle is used for attaching directly to a metal ring or fixed mounting point, such as on a bumper or sheet metal snatchblock that may have 90 degree or sharp edges which could cut a synthetic line. ”

Factor 55 donut pulley and a snatchblock pulley.
Aluminum Snatchblock Rings (aka “donut” rings) have replaced the all-metal, heavy, clanky, snatchblock pulleys of yesteryear. Since our winch lines are now synthetic rope instead of steel wire braid, we need pulleys that are gentler on our soft lines.
You would use the ring the same way you would use the old snatchblocks. First, anchor the pulley, usually to a tree saver attached to a tree or to a vehicle. Run a winch line through the ring, and then back towards the winch where you would anchor the winch line. The pulley has now effectively doubled the pulling strength of your winch.
The ring could also be used to redirect the pull of the winch line, so that you can winch from 90 degrees instead of straight on.
Recovery experts can even use multiple pulleys to achieve triple or quadruple the pulling strength, but that gets complicated and is not recommended for any of us to try at home who don’t want to jeopardize our vehicles.

Snatchblocks sandwich the winch line between two sliding plates to prevent a line from slipping off.
Traditional snatchblocks sandwich the line between two sliding plates, to prevent the line from slipping free — which is important when used for heavy lifting. Older style snatchblocks were designed for wire winch lines; not today’s thicker & softer synthetic lines. However, there are newer snatchblocks designed for synthetic lines.
Recovery Points
Recovery Points are not to be confused with tie-down points. When you are towing or recovering a stuck vehicle, you will be putting a great deal of stress onto the place where you attach your line. Those attachment points must be able to withstand the weight of the vehicle; or way more if you are using a kinetic recovery strap to free a bogged down vehicle or to winch a vehicle up the side of a steep embankment.
Tie-down points are only to secure a vehicle onto a flatbed carrier and prevent it from rolling off. They are usually thin sheets of metal with some openings to hook straps or chains through.
Civilian cars (as we like to call them) may have tie-downs located under the bumper, or may use eye-bolts that screw into (hidden) panels in the bumper. If you have to recover one of those vehicles, you may have to loop a tree saver strap around an opening in the chassis or around an axle shaft. Don’t do it if you are not familiar with the anatomy of cars. And always have the other driver sign a release form to indemnify you. At the very least, use your phone to video record the other driver stating that you are free from liability.
Recovery points are thick steel hooks or rings that are extremely secured directly or indirectly (via a steel bumper) to the chassis, and can withstand thousands of pounds of sudden tension.
Winching usually does not exert as much stress on a recovery point as a kinetic jerk, but it depends on the circumstances.
One of the distinguishing traits of offroad vehicles is that they are equipped with beefy recovery points (shackles) either from the factory or custom installed.


Jeep Wranglers come from the factory with recovery hooks protruding from their plastic bumpers. These hooks are suitable attachment points, other than the fact that your lines could slip off. Some duct tape will prevent that.
Jeeps come with a rear recovery point underneath the bumper on the driver side. If the Jeep has a receiver hitch, then feel free to use that with a receiver hitch shackle. Note the oval flat ring adjacent to the receiver hitch – that is NOT a recovery point.
Vehicles that have been upgraded or modified with steel offroad bumpers will have integral steel rings for mounting steel D-ring shackles, instead of those open recovery hooks found on stock vehicles.
Tire Repairs
As we mentioned earlier, there are three products that can be used to repair damaged tires on the trail without the need to remove the tire. Tire plug kits are readily available, and are used to plug punctures in the tread area. GlueTread are special patches and rubber bond that can seal up most sidewall slashes. Colby Tire Valves replace torn tire valve stems without having to unseat the tire from its wheel rim.


Winching… (not to be confused with “wenching”)
Everyone admits that mounting a winch on your front bumper makes your vehicle look badass. The real question is, do you really need a winch?
The overwhelming majority of winches never get used. But the law of Murphy dictates that if you are not equipped with a winch — you will need one.

Warn winch with Factor 55 flatlink
Winches can only help you during self-recovery (you went out alone?) if there is something strong to anchor to. For instance, out here in Nevada we jeep in desert environments or sandy dunes. Nothing but flimsy cactus or more sand all around us — nothing to attach the winch line to. They do make “land anchors”, but those literally are boat anchors and a pain to drive around with. There are YouTube videos depicting “stranded” people digging deep pits and burying their spare tire to serve as an anchor point, but often the ground is too hard to dig. (That’s why we keep reminding you to never jeep alone. And to have some sort of satellite communicator so you can call for help.)
Not only are winches costly, but you must have a reinforced bumper to mount them on. So if you haven’t upgraded to a steel, offroad bumper — you probably have no secure way of mounting. Remember, the winch could be putting several thousand pounds of strain against your bumper — so it must be firmly attached to the chassis.
Your winch should be capable of pulling twice the weight of your vehicle. Most Jeeps weigh around 4000-4500 pounds, so a winch rated at 9000+ is sufficient. Heavier vehicles, such as pickups, may require 10,000-12,000 pounds. The bigger the winch, the more it weighs — so consider that when selecting.
By using a pulley, such as a donut ring, you can effectively double the pulling strength of your winch. That gets you up to 18,000 pounds from a 9000 rated winch.
Almost everyone these days uses a synthetic line instead of the older, steel braid wire. Wire lines are strong and more durable, but if they do snap — that wire whips with a vengeance, causing severe injuries and property damage. Synthetic lines, when they break, just plop to the ground. But synthetic is more prone to abrasion and fraying.
Because Winches are a complex topic, we will cover them under their own sub-section in 201: On The Trail.